Simple Centrifuge
Clean waste vegetable oil (WVO), bio diesel, lube oils, and even hydraulic oil in your garage
Main
Ordering
History
FAQ
Contact
Lab Centrifuge
Gallery
Videos
About
 
Photo Gallery - This gallery represents the work over several years. Some designs have been replaced and/or updated as time progressed. Most images contain a date stamp visable on the large version. Please note the date when viewing. We are always experimenting with new concepts and designs. If you have any questions about any photo please contact us.
Total photos in gallery 1296 - Latest photo update 2021/12/10 18:48:01
Asterisk(*) indicates new photos in the past 30 days
Adapter 56C to 56J ( 15 )
Algae Recovery ( 42 )
Bacterial fermentation ( 1 )
Balancer Mandrels ( 8 )
Bearing replacement ( 25 )
Botry Culture ( 2 )
Building a gantry ( 16 )
Chestnut Extract ( 9 )
CNC Coolant ( 6 )
Coconut Oil ( 8 )
Construction ( 43 )
Contaminated diesel ( 2 )
Craig's Machine ( 31 )
Cross Drill End Bell ( 10 )
Crude oil ( 5 )
Custom motor shaft ( 23 )
Experimental Motor ( 19 )
Explosion proof motor ( 3 )
Feed Cone ( 29 )
Feed Cone with Fins ( 8 )
Feed Tube ( 3 )
Filter Paper ( 7 )
Ford on WMO ( 2 )
Foundry ( 5 )
Foundry 2 ( 18 )
Gear pump ( 2 )
Grinding fluid ( 19 )
Grinding fluid 2 ( 14 )
Heaters ( 9 )
History ( 11 )
Homemade Diesel ( 7 )
Homemade diesel 2 ( 41 )
Homemade Diesel 3 ( 15 )
Homemade Diesel 4 ( 12 )
How it works ( 3 )
Hydraulic Oil ( 3 )
Keyless Bushing ( 11 )
Lab Centrifuge ( 16 )
Lab Centrifuge 2 ( 18 )
Lapidary Cutting Oil ( 2 )
Lock motor shaft ( 6 )
Magnesol removal ( 6 )
Microwave heater ( 7 )
Misc. Mods ( 4 )
Mitsubishi 4x4 on WMO ( 10 )
New Feed Cone ( 16 )
New Feed Tube ( 7 )
New Rotor 2013 ( 24 )
New rotor design ( 16 )
Oil and Contaminants ( 47 )
Oil Skimmer ( 8 )
Our Shop ( 37 )
Peristaltic Pump ( 32 )
Powder Coating ( 10 )
Renderings ( 8 )
Retrofit rotor for WVOD ( 17 )
Rework Mount ( 10 )
Rotor fins ( 34 )
Rotor Fins One Piece ( 6 )
Seal ( 6 )
Sea Weed ( 4 )
Sediment removal ( 16 )
See thru lid - Building ( 16 )
See thru lid - Testing ( 28 )
Sight Glass ( 6 )
Skim Tube ( 56 )
Skim Tube for VCO ( 8 )
Small Settling Tank ( 14 )
Tanks ( 9 )
Tanks - Complete System ( 13 )
Tap drain ( 10 )
Testing Seal Screws ( 6 )
Tests by fuelfarmer ( 22 )
Turn key machine ( 38 )
Two part rotor ( 30 )
Ultrasonic filter cleaning ( 8 )
Updates ( 26 )
Users Machines ( 34 )
Vacuum pickup ( 3 )
VW on WMO ( 7 )
Water-Oil Seperator ( 7 )
Water trap ( 5 )
Wine Clarification ( 4 )
WVO Heat Tests ( 7 )
WVO Pump ( 6 )
WVO Tests ( 14 )
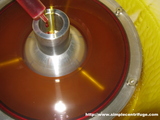
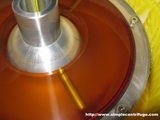
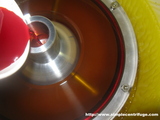
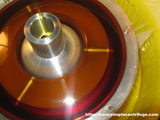
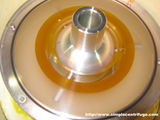
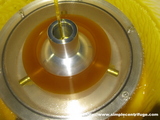
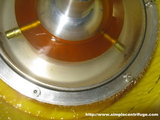
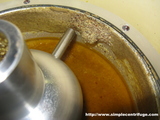
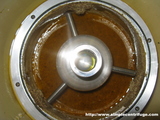
Tests by fuelfarmer
Glenn (fuelfarmer) has done a lot of testing over the past few years. I thought it would be good to post some of his photos. He has tested the original design and at present is playing with a modified version of the new two part rotor and feed cone. His photos are great and his insight into the centrifuge has been a huge help in improving the machine. All photos in this section are courtesy of Glenn :)
Glenn tested the new two part rotor and the old rotor using a 30% water and 70% oil mix at 30 gallons per hour. The results are clear. New rotor on the left, old rotor on the right. Browse through the gallery for more info. Glenn bought one of our first rotors back in 2007. He built this beautiful machine. Shortly after he started running it he noticed splashing. He writes:
If you look at the lid you can see drops of oil. Most are 1/3 to 1/2 of a rotation from where the oil drops into the bowl. I think the drops were bouncing or flying out of the bowl because of where they are. I could be wrong.
The bowl runs true and seem to work very well. It took me a lot of time to build the housing but it was a lot of fun.
Glenn tested the new two part rotor and the old rotor using a 30% water and 70% oil mix at 30 gallons per hour. The results are clear. New rotor on the left, old rotor on the right. Browse through the gallery for more info. Glenn bought one of our first rotors back in 2007. He built this beautiful machine. Shortly after he started running it he noticed splashing. He writes:
If you look at the lid you can see drops of oil. Most are 1/3 to 1/2 of a rotation from where the oil drops into the bowl. I think the drops were bouncing or flying out of the bowl because of where they are. I could be wrong. The bowl runs true and seem to work very well. It took me a lot of time to build the housing but it was a lot of fun.
Glenn came up with an ingenious solution. A splash guard. He writes:
Have you noticed oil splashing out of the CF bowl as it tries to merge into the wall of fast moving oil/ I came up with a solution to a problem that may not exist. A disc that fits inside of the bowl and the oil enters under the disc. This is the splash guard in action. This is a great photo that shows how violent the entrance of oil can be into the bowl.
Glenn came up with an ingenious solution. A splash guard. He writes:
Have you noticed oil splashing out of the CF bowl as it tries to merge into the wall of fast moving oil/ I came up with a solution to a problem that may not exist. A disc that fits inside of the bowl and the oil enters under the disc.
This is the splash guard in action. This is a great photo that shows how violent the entrance of oil can be into the bowl.
Glenn's dye tests confirm his fear. Some of the oil was splashing out. Glenn wanted to see what was going on. He built a see through top for the rotor. This is the new style two part rotor with feed cone. The feed cone was designed to address the splashing issue. Adding 30% dyed water and oil mix to the centrifuge at 30 gallons per hour. Most oil contains typically less than 5% water. This is an extreme test.
This test clearly shows the mixing action that happens inside the centrifuge. Shortly after the last shot you can see how quickly the water is pulled to the outside wall. This photo shows a side by side comparison of the new rotor and the old rotor running the same 30% water sample. Clearly the new rotor does a much more thorough job. I imagine that the mixing action we saw in the previous photos happens on the old open bowl, but rather than being near the wall it happens on the leading edge of the oil while passing though the cleanest oil. The feed cone is a must.
Water and oil.
Water and oil.
   
   
Numeric Control, LLC
PO Box 916
Morton, WA 98356