| Main |
| Ordering |
| History |
| FAQ |
| Contact |
| Lab Centrifuge |
| Gallery |
| Videos |
| About |
| Testimonials |
| "Lab" Centrifuge you can build for cheap! |
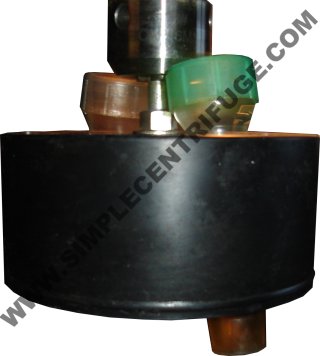
Centrifuges are expensive machines and often designed specific to the material being separated. Buy the wrong machine and you have a big door stop. It might be great for clarifying apple juice but worthless for oils. We really wanted to learn if it would even be worth our time and money. What we discovered has saved us both. The first centrifuge we built was a "lab" style that uses vials to hold the sample. This allowed us to "study" our oil and decide which restaurants were worth our effort. One restaurant's oil was nearly 80% garbage and water, not worth the pickup, while another's was nearly 95% pure. WARNING: Be mindful of the forces at work. We cannot be held liable if you choose to duplicate this centrifuge and ruin your clothes or drill press. YOU WILL DO BOTH. If the rotor fails and you are hit by flying parts you can lose an eye or even be killed. Send the kids and neighbors away when running samples. The construction of this early centrifuge was quick and easy. The vials are the covers from 12cc syringes (mediators) found at any farm supply. The rotor consists of a 4" ABS sewer cap and a bolt with a few washers. Basically drill a 3/8" hole in the center of the 4" cap and 4 evenly spaced 7/8" holes around the edge. You'll need to be very accurate. Wrong placement could cause the rotor to become unbalanced and fly apart. Next cut the head off a 3/8" bolt and install it into the rotor as shown below. I used 2 large fender washers with a nut on each side. This made a very strong mandrel. We tried a standard hardware mandrel like you might use with a cut-off wheel in a drill or die grinder. Save your money, it failed after only a few hours. Use the bolt! Glue everything together using a bit of silicone before tightening the mandrel. This has proven very durable. The images below are click able for a larger view. 
Next, the vials are inserted into the rotor in opposite holes or sides. You can run 4 samples at a time but we generally only do two at a time. When running we always put a 5 gallon bucket on the drill press table and bring it up until the top edge is above the chuck. This will catch any oil splatter and in the unlikely event that the rotor flies apart it should contain it. This discovery saved a lot of t-shirts. This it a short video of the centrifuge running. I slowed the rotor to better show the action but the principle is the same. The longer and faster you spin, the finer clarity you will achieve.
Click here for the video clip: abs_cap_centrifuge With this centrifuge you can now quickly evaluate your oil when it arrives. No need to wait days for it to settle. You can tell exactly how much recoverable oil you should get. |